Showing posts with label General Cards. Show all posts

Monday, 5 December 2011

December crept in rather quickly........as we found out on Thursday morning when the youngest son got out of bed......to no advent calendar!!!!!! Okay it was a mix of getting one later, having a look at some upmarket ones online but then deciding against it and then of course realising on Thursday morning that we hadn't actually got any!!! We duly explained to a the younger son that he would be getting his after school as dad was off work and would go and get him one.........only to find by that evening..........we couldn't actually even buy one in our town!!!

Not wanting to make younger son think that he would be the only child without an advent calendar.....I told him (without thinking) that I would make him one after he had gone to bed and he would then be able to open up two windows the next morning.........he of course went to bed rather excited and very happy.

At eight thirty on Thursday night, I was beginning to wonder why I had even opened my mouth to suggest I would make him one and even more so......to start making one after eight thirty at night!!!! Having searched through my stash and a little help from Google......sour cream packets were born!!

I had some thick pearl A4 papers from Crafters Companion. I cut each sheet into four equal size rectangles, used some double sided tape to glue together two of the sides, trimmed with some fiskars scallop edge scissors, and finished of with a punched hole at the top and bit of fuzzy wool and a line of string and paper clips to hang it. Numbers generated on the computer and punched out using a circle punch.

By midnight it was all assembled........I managed to find two treats for days 1 and 2 and the advent calendar was ready. He wasn't to know the other packets were empty......until a mad dash to the shops on Friday afternoon!!

The next morning.....the facial expression said it all.......he was so pleased with the "world's biggest advent calendar"............we have to meticulously take down each one and he takes out the treat, then it has to be hung back up.............it is his biggest pride and joy!!!

I am going to showcase this on Make it Monday.........for all the hours it took.........it still goes to show how a little paper, tape and imagination can bring happiness to someone.


Thursday, 27 October 2011

It's soooooo wet today. The rain has been pouring since we got out of bed and hasn't stopped. However this makes it a good day for sorting - much to the kids dismay!!! Bedrooms have been de-cluttered and de-junked!!!

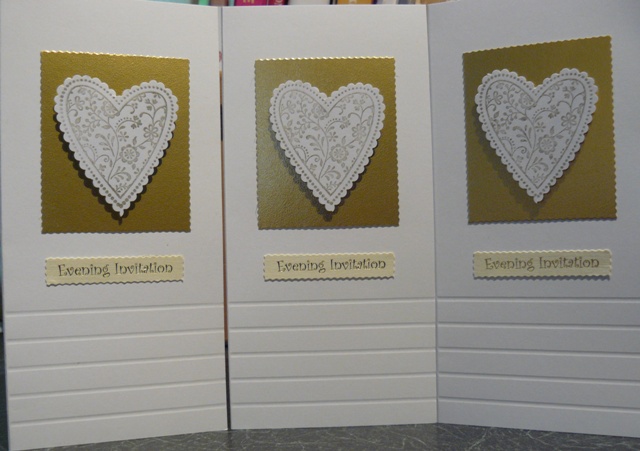
Today I am showcasing some invitations I have started making for a very special couple - my in-laws will be celebrating their 50th Wedding Anniversary in December and I am on a mission to make the invitations and get them in the post by the end of tomorrow so they will arrive in St Helena by the end of November (I hope).


Now as any St Helenian will know.....Cheese straws are featured highly at any party, or gathering within a St Helenian community. These fingers of crispy cheesy pastry are addictive....I mean once you start on them......the only point at which you can stop picking at them is when they are all gone. From a bakers point of view.......bake them when you're home alone and have lots of spare time........you will at least have some time to savour your effort.....before they disappear and you're left with nothing but the washing up!!!


Recipe

Preheat the oven to 150 degrees C/300 degrees F/Gas Mark 2

8 oz/225g Mature Cheddar Cheese grated
2 oz/50g butter
4 oz/110g Self Raising flour
1 egg beaten
pinch of salt
cayenne pepper or paprika (amount depends of level of spiciness)
Beaten egg for glazing

Method

Rub the butter into the flour until it resembles fine breadcrumbs
Stir in the salt and the Cayenne pepper or paprika
Stir in the grated cheese making sure the cheese is distributed in the flour
Add the beaten egg gradually to form a firm dough.
Wrap in Cling-wrap and chill in the refrigerator for 30 minutes or longer
After 30 minutes roll out the dough on a lightly floured surface to about 1/2 cm (half cm) thick. (It may be easier to cut the dough and roll out in small quantities).
Using a knife or pizza cutter, cut the dough into straws measuring approximately 10 cm by 1 cm
Arrange the straws on a baking tray with a gap between each. Bake for approximately 20 minutes until golden.
Remove from the oven and leave on the tray to cool (They will crisp on the tray as it cools). Removing them too soon from the tray will mean chewy cheese straws!!!!

They are sooo time consuming to make......but so worth the effort.

According to my seven year old try makes practice - not practice makes perfect!!!


Yesterdays Baking - Cheesy Monkey Bread (Delicious with Soup)

Monday, 22 August 2011

Anyone who know's me well enough, will know that I love to bake (calorie wise I cant do it on a daily basis)!!! When I saw this free digistamp at Paper Garden Projects, I knew it would be perfect coloured as a chocolate sponge with layers of pink frosting! I coloured the image with promarkers, decoupaged the frosting so that it stood out from the card (ahh no photo) and it looked pretty good If I must say so. The papers came free with an edition of Papercraft Essentials Magazine, the sentiment stamp from Craft Stampers, ribbon and cardstock from my stash and some faux stitching. What better way to layer a cake card than on a doily - just perfect! Having finished the card, I toyed with the idea of adding some "sprinkles" - it's a cake after all......so I tried some glittered stars, they looked good but just didn't seem right, so I scraped them off. I hunted through my box of stash, but nothing seemed to fit......then I had an idea...... real cake sprinkles - white non pareils (posh name for hundreds and thousands), mixed with some clear glue and yes, they complimented the card perfectly! My seven year old thought I had really lost the plot "What! Sprinkles on your cards?" he exclaimed as he walked past!!!


Ice Cream Cupcake!

I had a go at baking these some time ago, but just came across the pictures again! The sponge was baked inside the cones, cooled and then iced with vanilla cooked flour butter cream, cadbury's flake chocolate and sprinkles. These cones were the smallest I could get in the supermarket with a flat base so undoubtedly, they contain too much cake for a little one, but they could be filled with less cake mix, a load of chocolate and then the buttercream - yeah they would go down well with most little ones!! The cones managed to stay crisp for several hours, although the one I kept until the next day (just to see how long the cone would stay crisp for), was rather chewy!! Best advice - Bake and Eat on the same day!!!!


The Inside!


Thursday, 7 January 2010

Snow, snow and more snow......no work, so time some spare time for crafting :) I love this little stamp from Snag'em Stamps. I watercoloured the flowers and leaves and added some pearl centres and gel pen dots with some piercing, red and black cardstocks and a sentiment from Craftwork cards to complete the card.
Valentines is just around the corner (crafters have to keep one step ahead) so I am working on some ideas for the next big occasion after Christmas :)

Sunday, 21 June 2009

The week has flown by again so quickly. I have had little time to do any crafting for fun - I had a commisson for ten cards - mostly fathers day and this little cowboy on the right had his 5th birthday on Thursday.......so it was a birthday party and tons of baking to do. I also decorated 36 sacks for the cowboys and cowgirls......but didnt take a picture :(

Tuesday, 26 May 2009

I was asked to make a few cards for the end of the school year as a thank you for various tutors. After much thought, and lack of suitable teacher stamps etc, I came up with this idea - and its totally made on the computer. Background paper with random typed letters, with the words thanks included, and the blackboard front with white text - covered every aspect of the requirement perfectly


Tuesday, 5 May 2009

Sugar Nellies Country Girls have been in the shop - I ordered two of them purrfect playmates and fragile beauty. I have been told they have been dispatched so I like most others, will be stalking the postman or the next day or two. I haven't been playing much - I have a large order for menus, place settings etc so I am getting well stock into them at the moment.....so I can squeeze in some playtime when the Country girls arrive.

Sunday, 26 April 2009

The days seem to fly by so quickly - I know I am always saying this but when you week is filled doing work, fitting in your hobbies, and being the kids taxi driver, the time flies.

Two cards I made this evening - the wedding one has Dovecrafts Eastern Blooms background paper, which I ran through the printer to add the Congratulations and the names of the bride and groom. The Wedding day Chipboard self adhesive sticker, I found in one of the little pound shops. Flower made using woodware daisy punch and the ribbon came from my stash. The second card is a commissioned one too. The red heart and Honey letters are made from chipboard, bazzill swiss dots cardstock, Happy birthday sentiment done on the computer and metal heart which I cut out and embossed from some craft metal.


Tuesday, 7 April 2009

Going to make this a bit of a long post as I have so many pictures to upload that I have lying around. Firstly this weeks challenge from Cupcake Craft Challenge is Folds. I made this little box called 2-5-7-10 using the Tutorial from here. It is so easy to make and it makes the smallest of gifts a joy to give. This one I am sending for my mum for her birthday. The pearls on sterling silver which you can see in the picture I bought in bulk last year and they have made wonderful presents over the year for girl pals and family - naturally two pairs are inside for Mum. I have used cream cardstock. brown ribbon from my stash, brown and pink cardstock, Snag em rubber stamp flowers, and happy birthday rubberstamp (cant remember where this one came from). I watercoloured the flowers with hints of pink and green leaves and added a few peel off white dots for extra decoration.


I won a competition in Papercraft Essential Magazine issue 40 and my prize came yesterday from Kirsten Lapping Designs - a set of stamps, pots of yummy glitter, embossing powders and small decorations for shaker cards etc, a box of ATC cards and a pen. The acetate wraps and card inserts are to follow.


The Magazine Page showing my card


The whole page from the Magazine


Sunday, 22 March 2009

Back in January, I entered a competition in Papercraft Essentials Magazine Issue 37, which was to make a card featuring either fairies or dragons for a chance to win one of Kirsten Lapping Designs, enchanted materials. I threw all caution to the wind and entered, and guess what, when I had my magazine on Thursday, I was stunned to see that I was one of the six winners (will show you a picture of the page later). The image I used came from the DAISE Company, brown cardstock, make a wish stamp from Studio G, brown and yellow ribbons, white gel pen, daisy punches, button and scalloped edge scissors. I added some extra wings to the image using scraps of vellum, layered with foam pads, and edged with a silver gel pen. I also used the silver gel pen to create spots on the wings.


Tuesday, 17 March 2009

This weeks challenge from Cupcake Craft Challenges is a colour combination - Brown and Pink, or Brown and Blue or Brown and Green.
Brown is one of my favourite colours and mixed with pink....hmm delicious combination....so it just had to be a cake!
I have cut out a cupcake shape making the base of pink card which I scored lines on to resemble a cupcake case, the pink topping is from a paper which came free with Papercraft Essentials Magazine. The pink ribbon is from my stash, the brown background paper is Doodlebug Chocolate Truffle, The sentiment is from craftwork cards, and the raspberry and chocolate cardstocks are from DS Crafts. I used a punch to make little sprinkles to place on top of the cake.
Also Cupcake Craft Challenges are looking for a new design team - It closes on the 21st March 09.


Friday, 27 February 2009

One card and a cake today. The mother's day card has been made with papermania's Rasberry and Champayne creative tones paper, computer generated sentiment, ivory ribbon, pink cardstock which I scalloped with Keepsakes romance board, and fabric flowers and brads. These fabric flowers, I bought last summer in a sale - a great big bag of them but put them in my pile of things to use and never really got around to using them - have found a new use for them now though - Mother's Day cards!

One cake for today....dark chocolate with a chocolate wrap, chopped Lily O'Briens truffles, white chocolate buttons, milky way stars and a length of navy ribbon.


Thursday, 4 December 2008

This is my first post for December and first for a while. I have now finished the wedding invitation order which included RSVP cards and Menu's. A big congratulations to Nichola and Andrew on their forthcoming Nuptials and a big thank you to you both for being so patient - the days and days of waiting for the invitations to be finished......they are mostly handcut and so 95% handmade - I have even hand embossed every single heart (all 65 of them). Now to sort the pictures to post....

Tuesday, 25 November 2008

I know these are n't the best of pictures.....I thought I would take them on a dark brown background, which looked nice at the time of taking the photos, but looks awful now that I have uploaded them. Still I wanted to show you these (particularly those in the UK and near Poundland)! I bought these 3d self adhesive decorations from Poundland on the weekend. They are well decorated and made of chipboard. In 5 minutes flat I had made the two cards below, using some bazzill dots cardstock and one of these decorations. I did add some more doublesided tape behind them as I didnt think they had quite the best adhesive on them......but aren't they brilliant.....now I wish I had bought more!


Tuesday, 21 October 2008

The days are flying by far too quickly. I havent been crafting today - well my youngest was poorly so was off from Pre-school, and then I have wrapping presents for our family in St Helena. Yes I know it's eight or nine weeks until christmas, but they have to be with the shipping agent for Thursday in order for them to make it to the island sometime mid December!
I have also been making up these little bags of treats for Halloween - Small zip lock bags, filled with scary wrapped chocolates. I have scored some black card and trimmed with the scallop edge scissors. The images are clipart which I have printed on orange cardstock and cut out with a circle punch. I have cut circles our in purple with a compass cutter and then edged them with the scallop scissors too. The black cardstock has been stapled to the bags under the orange and purple topper - quick, simple and easy.


Thursday, 24 July 2008

Monday, 23 June 2008

Friday, 6 June 2008

Sunday, 27 April 2008